
Have you ever looked around your home and thought it could use a little sprucing up? Maybe you’re tired of the same old decor, or perhaps you’re just itching to get your hands busy with something creative. Whatever the reason, you’re not alone. This post is for anyone who craves a fresh and personal touch to their living space without breaking the bank.
If you’re someone who enjoys crafting or simply loves to make things with your own hands, you’re in for a treat. A lot of us want to create a home that reflects our unique style, but shopping for new decor can be overwhelming and costly. The good news is that you don’t always need a big budget or elaborate supplies to achieve a stunning look. With a bit of imagination and some everyday items, you can transform your space into something special.
That’s why I pulled together 25 DIY crafts for home decor that are both fun and easy to make. These ideas will help you tap into your creativity while giving your rooms a fresh vibe. All you need are some common items you probably already have lying around the house. Get ready to dive into projects that are simple, budget-friendly, and perfect for brightening up your home.
Whether you’re a seasoned crafter or just getting started, these projects are designed for every skill level. You can create beautiful pieces that will impress your friends and family, all while enjoying a little time to yourself. Let’s get started on unleashing your inner artist and making your home a place you absolutely love!
1. Pallet Coffee Table
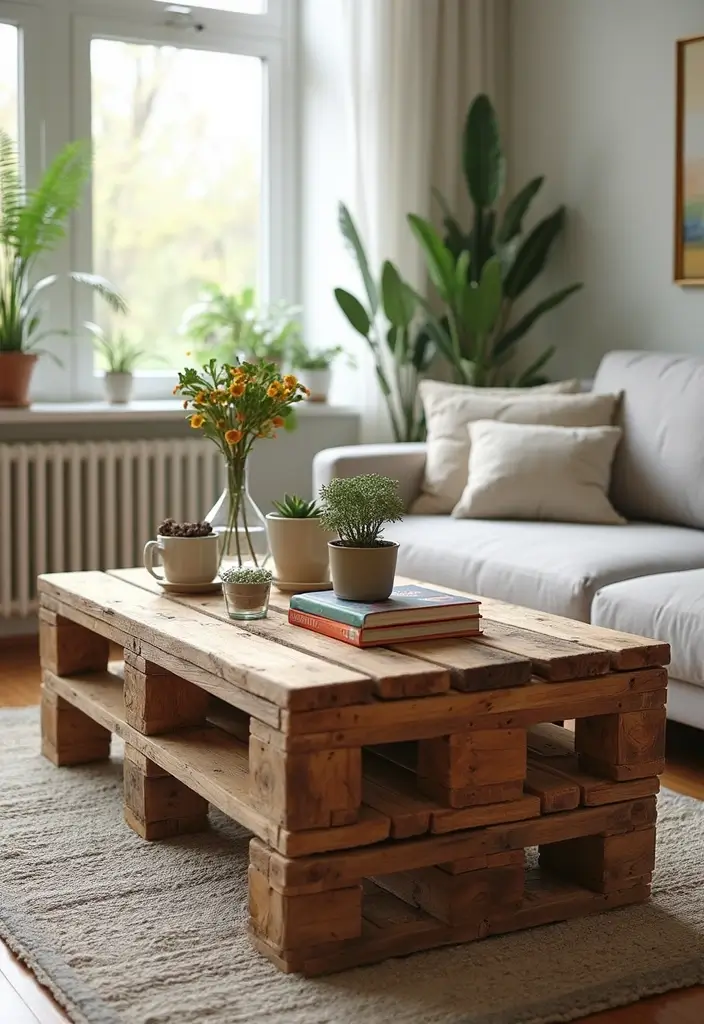
Transform your living space with a charming pallet coffee table. This simple piece not only looks amazing but is also a fantastic way to recycle materials. Imagine a rustic wooden table in your living room, adding warmth and character. You can easily find wooden pallets at local stores or even online. Many people love the versatility of pallets, and Pinterest is filled with creative inspiration for using them in home decor.
Start by sanding the pallet to make it smooth and safe. Choose a paint or stain that matches your style—perhaps a bright white for a coastal vibe or a deep brown for a cozy, rustic feel. You can keep the natural wood look for a more earthy appeal or give it a glossy finish for a modern touch. This project is not just practical; it’s a great conversation starter for guests.
To make your pallet coffee table even more functional, consider these handy tips. Adding wheels can make it easy to move around your space. A sheet of glass on top can give it a chic, polished appearance. Decorate the table with your favorite books, a stylish vase, or a vibrant potted plant to create a lovely centerpiece that reflects your personality.
• Add wheels for easy mobility around your room.
• Use glass on top for a sleek, modern look.
• Decorate with plants or books for a personal touch.
• Choose colors that complement your existing decor.
This DIY project is budget-friendly and lets you express your style while enhancing your living area. Enjoy creating a unique piece that feels like home!
2. Ladder Bookshelf
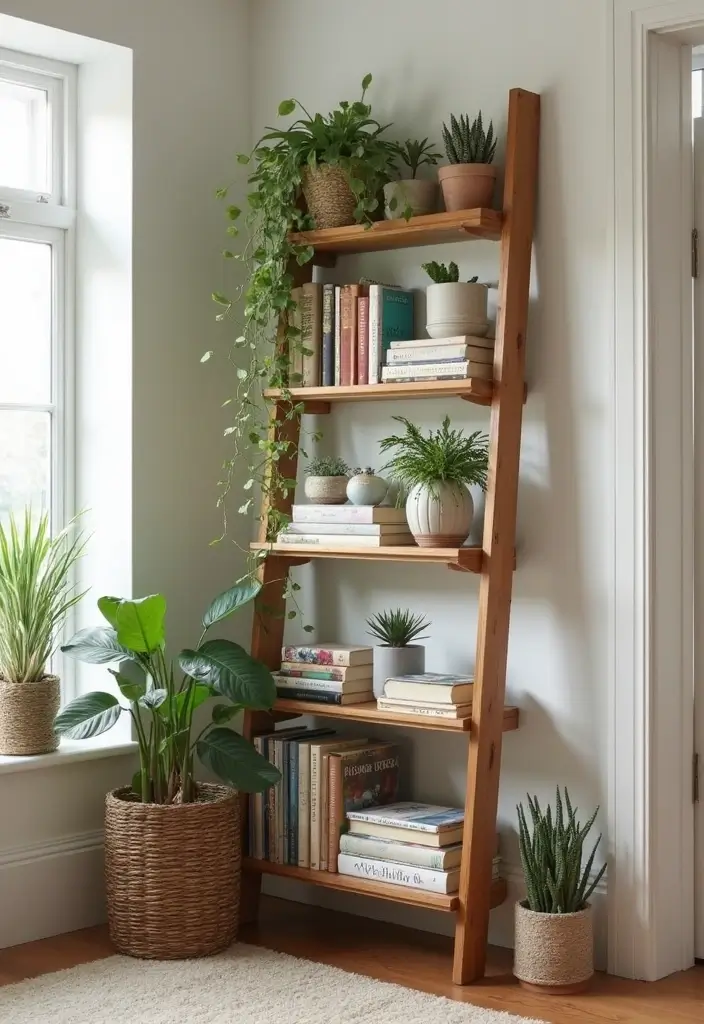
Transform an old wooden ladder into a stylish bookshelf that’s both functional and eye-catching. This clever DIY project can beautifully elevate your home decor. Picture a rustic ladder, painted in a soft pastel hue or a bold color that pops against your walls. Lean it against a wall or tuck it into a cozy corner. Use its rungs to display your favorite books, vibrant plants, or charming decorative pieces. This trend, loved by DIY enthusiasts on Instagram and Pinterest, brings a touch of creativity to any room.
Ready to get started? First, choose a ladder that fits your space. A vintage ladder can add character, while a newer one can provide a fresh look. A simple coat of paint or stain can transform its appearance without breaking the bank. Consider mixing colors for a playful vibe or going for a sleek monochrome look. You can also add small baskets on the lower rungs for extra storage. This project not only saves space but also makes your home feel warm and inviting, perfect for showcasing your love for reading and decor.
• Choose a ladder that complements your room’s style.
• Paint each rung in different colors for a fun effect.
• Place potted plants on the rungs to add life.
• Add small baskets for practical storage solutions.
This DIY ladder bookshelf is a simple yet impactful way to express your personality while keeping your space organized. Enjoy the process of creating something unique that reflects your style!
3. Mason Jar Wall Sconces
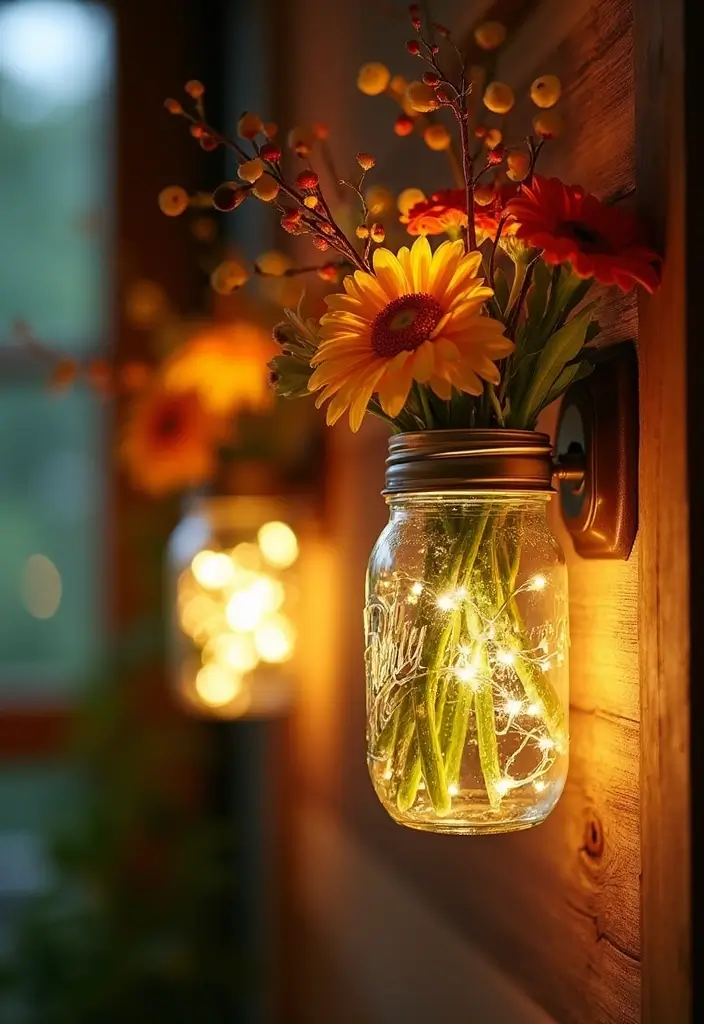
Brighten up your walls with charming mason jar wall sconces. These delightful pieces bring a rustic touch to your home, transforming simple jars into eye-catching decor. Start by attaching mason jars to old wooden planks. Use metal clamps to secure the jars, then hang the planks on your wall. Fill the jars with fresh flowers, flickering candles, or glowing fairy lights for a magical ambiance. This trendy decor idea is all over Pinterest, inspiring many to create their own unique designs.
When making your sconces, feel free to get creative. Paint the wood planks in soft whites or pastel colors for a fresh, modern look. If you prefer a more rustic vibe, wrap the jars with burlap or twine for added texture. Position the sconces in pairs on either side of a mirror or window to create balance and symmetry. This project is budget-friendly and a great way to personalize your space, making it feel warm and inviting.
• Use old wood planks for a rustic base
• Choose pastel colors for a fresh look
• Add twine for a textured finish
• Place sconces symmetrically for a balanced design
With these simple steps, you can turn everyday items into stunning home decor. Mason jar wall sconces are perfect for showcasing seasonal flowers or candles, making them ideal for any occasion. Enjoy the cozy feel they bring to your home!
4. Upcycled Chair Planter
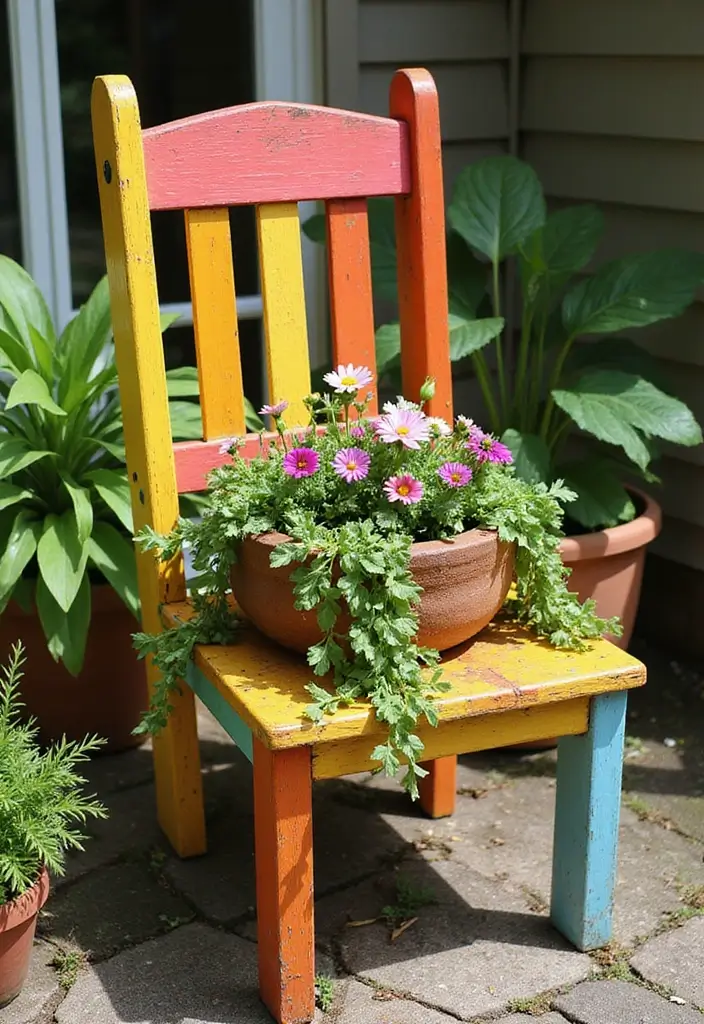
Breathe new life into your old chairs by transforming them into eye-catching planters. Picture a weathered wooden chair sitting proudly in your garden, its seat replaced with a colorful pot brimming with lush greens. You can paint the chair in cheerful hues like sunny yellow or ocean blue, giving your outdoor space a vibrant touch. This project not only enhances your garden’s charm but also adds a playful element to your decor, perfect for those who love a bit of whimsy in their yard.
To get started, look for chairs with unique designs. Thrift stores or yard sales are great places to find interesting pieces at low prices. If you’re on a budget, consider using leftover paint or materials you already have at home. Once your chair is ready, choose hardy plants like succulents or trailing vines, which thrive in pots. Position your planter chair in a sunny spot to ensure your plants grow strong and healthy. This project is ideal for garden enthusiasts wanting to personalize their spaces without spending a fortune.
• Choose unique chairs that stand out in your garden
• Use bright paint colors to make a statement
• Pick hardy plants like succulents for easy care
• Place the chair in a sunny spot for optimal growth
With just a bit of creativity, you can turn your old furniture into stunning focal points that showcase your style. Enjoy the satisfaction of creating something beautifully unique!
5. Wine Cork Coasters
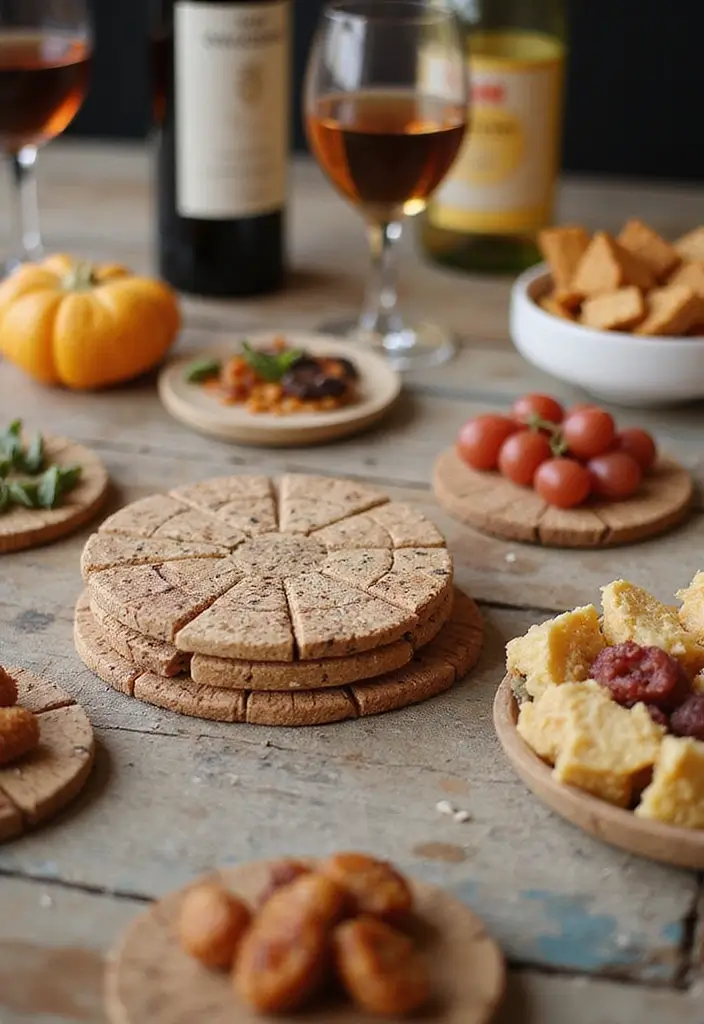
Turn your leftover wine corks into charming coasters! If you’re like many wine lovers, you probably have a stash of corks lying around. Instead of tossing them, give them new life by crafting unique coasters. These coasters are not only practical but also bring a personal touch to your home decor. Picture a set made from natural corks, adding warmth and texture to your tabletops. You can choose a round or square shape and arrange the corks in a fun pattern. Pinterest is full of creative ideas for this DIY project, making it a trendy choice for your space.
Getting started is simple and budget-friendly. Gather enough corks to cover your chosen base—think about 15 to 20 corks. Use hot glue to secure them in place, and let your creativity flow. You can even mix corks from different wines for a colorful twist! To keep your coasters looking great, finish them with a clear sealant. This extra step protects them from moisture and spills. These coasters are perfect for entertaining guests or adding a rustic feel to your living room, making it cozy and inviting.
• Use hot glue to secure corks easily
• Choose a variety of corks for color and texture
• Seal with clear spray to guard against moisture
• Gift them as personalized presents for friends
6. Fabric Scrap Wall Art
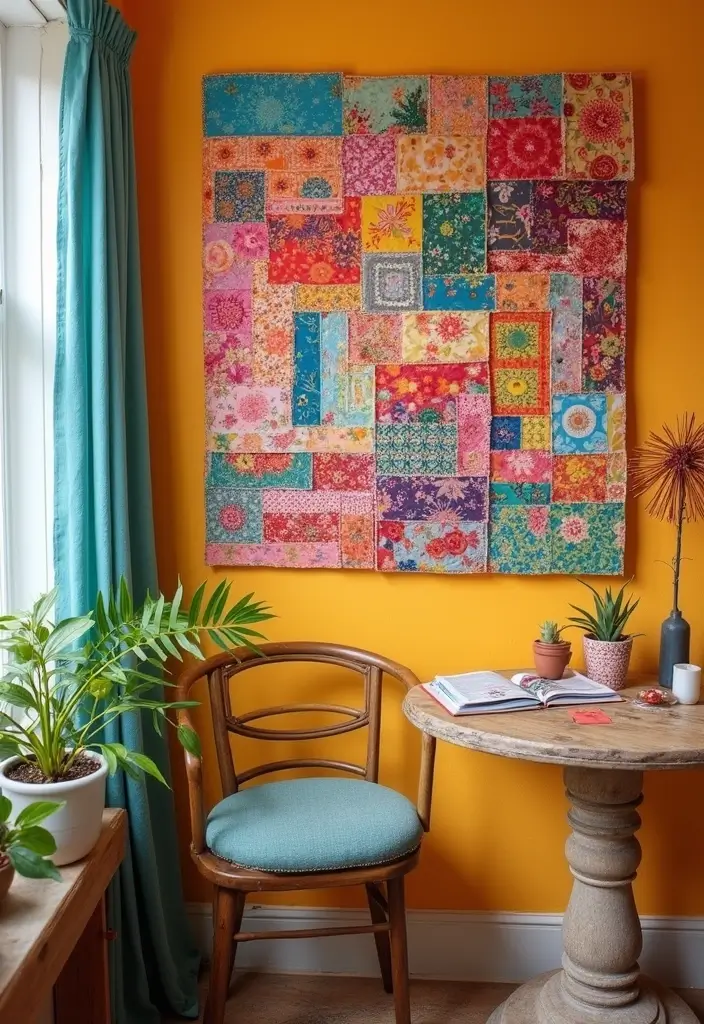
Create beautiful fabric scrap wall art that adds personality to your home. This project is a fantastic way to transform leftover fabric into something eye-catching. Grab a blank canvas and some glue, then start layering your scraps in colorful patterns. You can create a cozy patchwork design or go for a bold, abstract look. Pinterest is buzzing with these creative ideas, showing how unique and personalized your walls can become.
To get started, choose fabrics with different textures and colors. This adds depth and vibrancy to your artwork. Don’t worry about spending too much; you can use bits and pieces from old clothes or fabric remnants from sewing projects. Once your art is complete, consider framing it. A simple frame can make your piece stand out even more. Hang multiple pieces together to form a stunning gallery wall. This approach not only showcases your creativity but also makes your space feel inviting and warm.
• Choose colorful fabrics for visual interest
• Layer different textures for depth
• Frame your artwork to elevate its look
• Hang multiple pieces for a gallery wall effect
This DIY project is not just fun; it’s also a great conversation starter. Friends and family will admire your creativity. Plus, you’re giving new life to materials that might have ended up in the trash. So gather those fabric scraps and start creating your own stunning wall art today!
7. Recycled Tin Can Lanterns
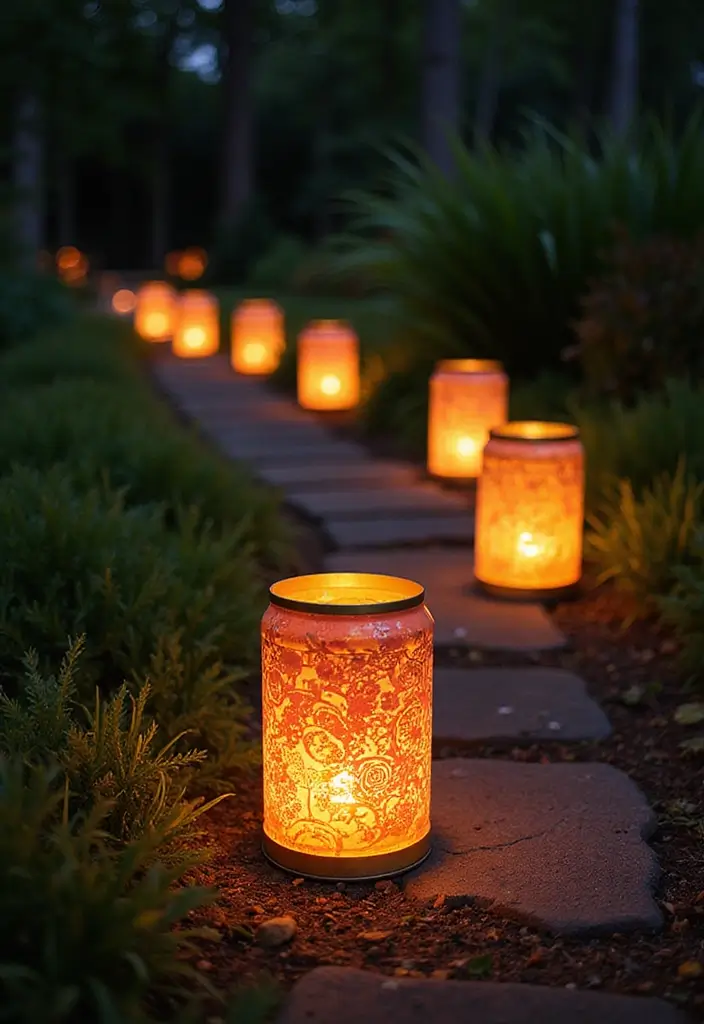
Create magical ambiance in your garden or porch with recycled tin can lanterns. These charming creations can elevate your outdoor space without costing a fortune. Start by gathering some empty tin cans—think soup or coffee cans. Clean them thoroughly, removing any labels or glue. Fill each can with water and place it in the freezer overnight. Once frozen solid, take them out and let the fun begin!
Use a hammer and a nail to gently punch holes into the frozen can. You can create beautiful patterns like stars, hearts, or simple dots. After you finish your designs, run the can under warm water to melt away the ice, leaving your artistic lantern behind. Finally, drop a tea light or LED candle inside, and watch as it casts a warm, inviting glow, perfect for evening gatherings.
These lanterns are not just eco-friendly; they also add a personal touch to your decor. Mix and match different sizes for a layered look. You can also paint your cans in vibrant colors to give them extra flair and protection. Position them along pathways, hang them from tree branches, or set them on tables to create a cozy atmosphere.
• Punch unique holes for creative designs
• Use various can sizes for visual interest
• Paint cans to match your decor style
• Place them strategically for maximum effect
These tin can lanterns will not only light up your nights but also spark conversation among your guests, making your home feel warm and inviting. Enjoy crafting these simple yet stunning pieces!
8. Clothespin Photo Display
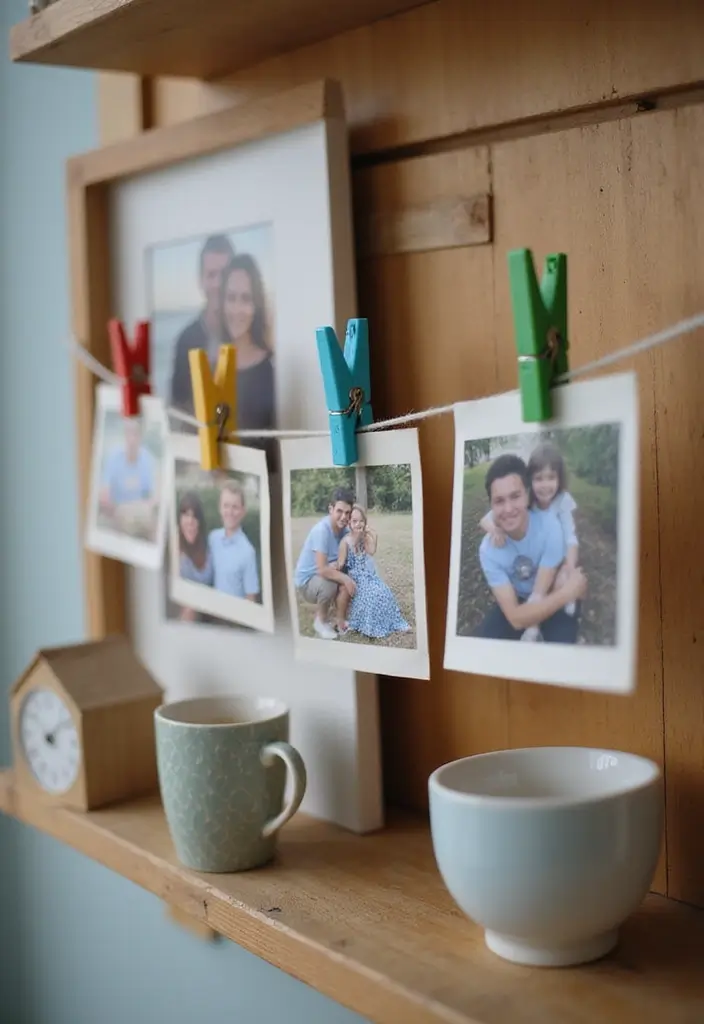
Bring your cherished memories to life with a delightful clothespin photo display. This crafty project adds a personal touch to your walls and is an eye-catching way to showcase your favorite photos. Simply take a sturdy piece of string or twine and suspend it between two hooks on your wall. Clip on your most cherished moments with colorful clothespins, creating a gallery that tells your story. Whether you choose bright colors or natural wood finishes, this display can match any decor style, making it a versatile choice. Pinterest is buzzing with ideas on how to customize these displays, ensuring yours will stand out!
Ready to craft? You don’t need to spend much to create this charming display. Start by gathering materials you already have at home or visit your local craft store for affordable supplies. Consider using seasonal photos to keep the display fresh; swapping out pictures can make your space feel new and inviting. Plus, adding string lights can transform your display into a cozy evening feature. This project is perfect for anyone wanting to add warmth and personality to their home without breaking the bank.
• Use twine or string for a rustic feel
• Choose vibrant clothespins to add color
• Incorporate fairy lights for a magical glow
• Rotate photos seasonally for a fresh vibe
With a little creativity, your clothespin photo display can become a focal point in any room, inviting guests to share in your joyful memories.
9. Upcycled Door Headboard
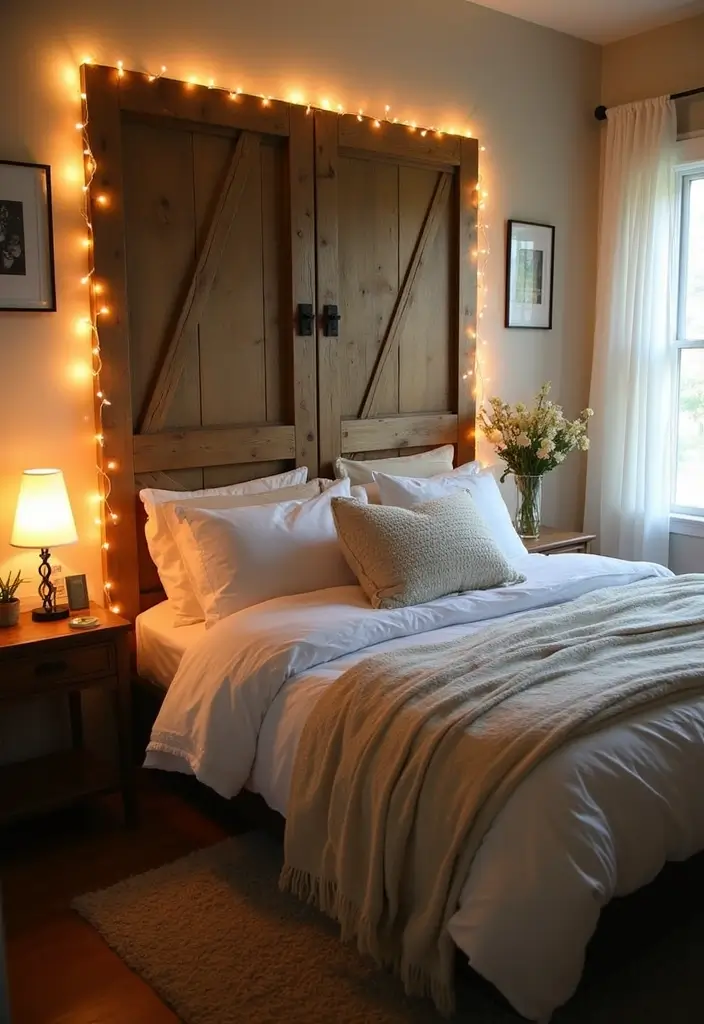
Transform your bedroom with an upcycled door headboard. This project not only saves money but also adds character to your space. Choose a vintage door for a rustic vibe, or go for a sleek modern one. You can paint it a bold color to make it pop or leave it natural for a warm, authentic feel. Pinterest is buzzing with these headboards, showcasing how they become striking focal points in any bedroom.
Getting started is easier than you think. First, sand down any rough edges for a smooth finish. Next, decide whether you want it attached to the wall or freestanding. If you opt for the latter, ensure it is stable. You can also add shelves or hooks to maximize function. This stylish DIY project is perfect for those wanting to express their individuality while staying budget-conscious. It makes your room feel cozy and uniquely yours.
• Use a vintage door for a rustic feel
• Choose a bold paint color for an eye-catching look
• Add shelves for extra storage and decor
• Hang fairy lights to create a warm atmosphere
With just a little creativity and effort, your upcycled door headboard can become a stunning centerpiece. It’s not just a headboard; it’s a conversation starter that reflects your style. Embrace this fun project and watch your bedroom transform!
10. Pumpkin Spice Candle Holders
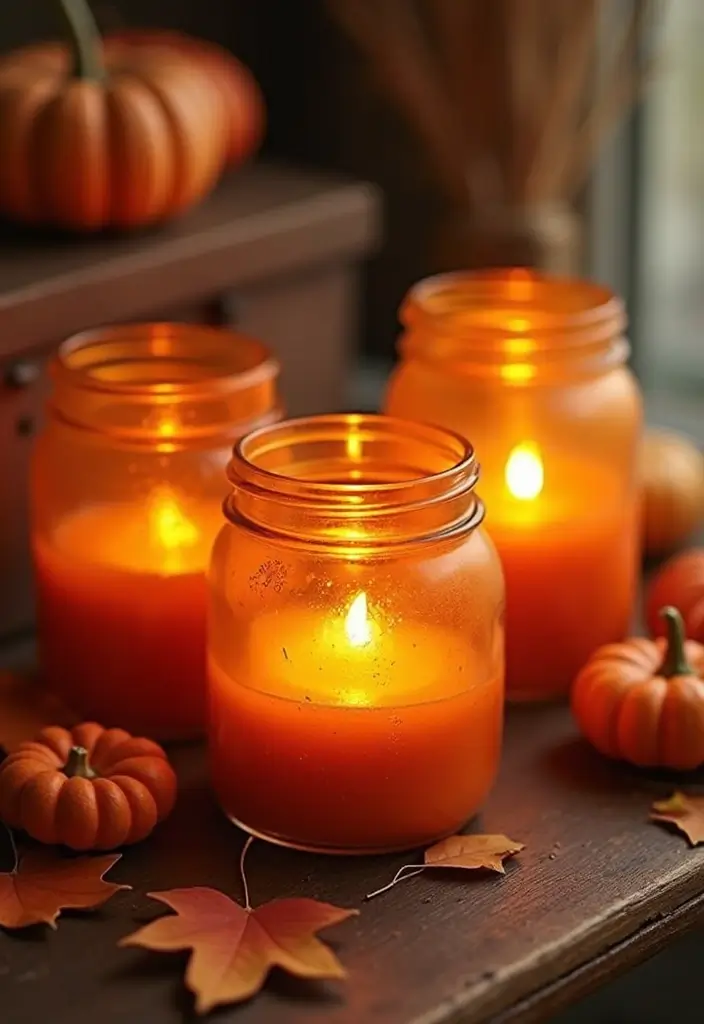
Get ready to brighten up your home this fall with charming pumpkin spice candle holders! You can easily transform empty glass jars into beautiful decor pieces that capture the essence of autumn. Start by thoroughly cleaning your jars and peeling off any labels. Next, get creative! Adorn the outside with faux leaves, twine, or colorful ribbons. This simple touch adds a festive flair that’s perfect for the season. As seen in popular DIY blogs, these warm candle holders create a cozy atmosphere that feels inviting and stylish.
Here’s how to make this project work for you. Use a mix of jar sizes for an eye-catching display on your table or mantel. Opt for scented candles like cinnamon or vanilla to enhance the autumn vibes. You can even fill the jars with fairy lights for a magical glow. This project is budget-friendly and allows you to add personal touches to your decor. Cluster them together for a more significant impact, making your space warm and welcoming during chilly evenings.
Tips for Your Pumpkin Spice Candle Holders:
– Use jars of varying sizes for visual interest.
– Choose warm colors like orange, brown, or gold for a seasonal look.
– Add scents like cinnamon or nutmeg for a cozy aroma.
– Place them in groups to create an eye-catching centerpiece.
These DIY candle holders are sure to spark joy and bring a touch of autumn into your home. Happy crafting!
11. T-shirt Pillows
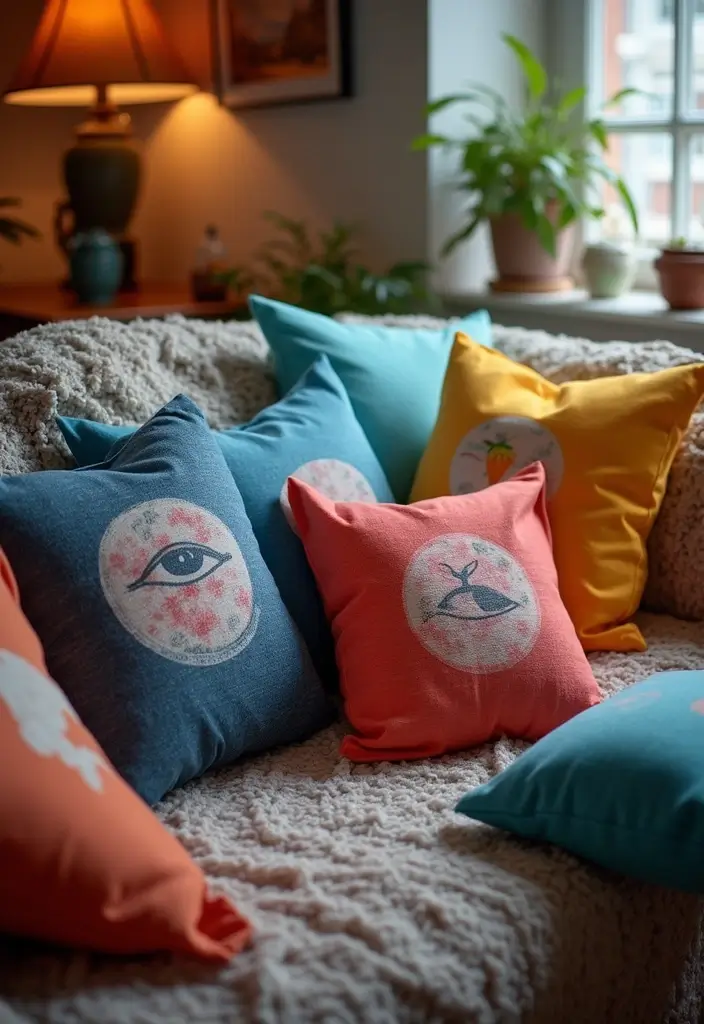
Turn your old T-shirts into stylish and comfy pillows! This clever DIY project gives your worn-out tees a new life while adding a personal touch to your home. Imagine using your favorite graphic tees or a shirt with sentimental value. You can choose vibrant colors or soft pastels to match your decor. Pinterest is filled with ideas for these unique pillows, making them a trendy choice for any room.
To get started, cut your T-shirts into even squares or rectangles. Sew three sides together, leaving one side open. Stuff the pillow with pillow stuffing or even leftover fabric scraps. It’s a budget-friendly project that won’t break the bank. Plus, it’s a fantastic way to showcase your personality in your living space. These pillows can be perfect for your couch, bed, or even as a cozy floor cushion. They make your home feel warm and inviting.
• Use shirts that have fun graphics or special memories.
• Choose different shapes for a playful vibe.
• Pick colors that complement your existing decor.
• Add personal touches like fabric paint or patches.
This project is not just about crafting; it’s about creating pieces that spark joy and conversation in your home.
12. Vintage Suitcase Side Table
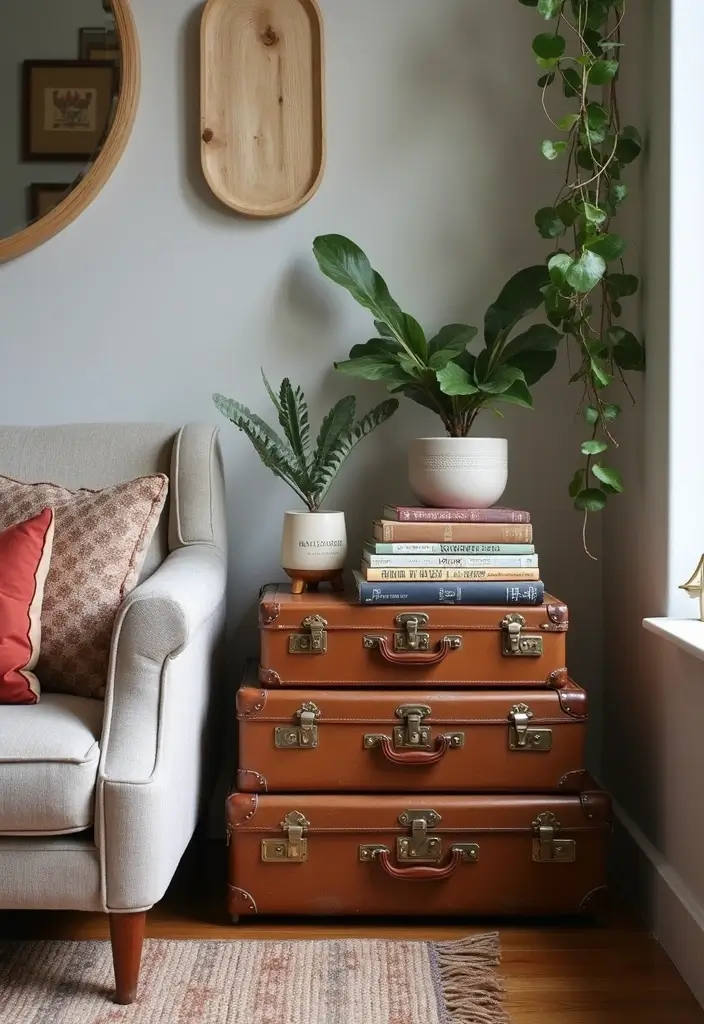
Transforming old suitcases into a vintage side table is a fun and stylish way to breathe new life into your home. Picture this: a stack of colorful, mismatched suitcases, each telling a story of travel and adventure. Choose bright colors or soft pastels that complement your existing decor. This trendy idea, popular on Pinterest, serves both as a functional piece and a charming conversation starter. Imagine how your guests will be drawn to it, curious about its history!
To make your suitcase side table work for you, start by stacking two or three suitcases of varying sizes. Secure them with sturdy straps or decorative brackets. If you want extra stability, add wooden legs to the bottom. This project is budget-friendly—thrift stores often have suitcases at great prices. Not only does this project help organize your space, but it also adds a touch of nostalgia, making your home feel warm and inviting.
• Use vibrant paint to match your home’s color scheme.
• Pick suitcases of different sizes for visual interest.
• Place the top suitcase on display for your favorite decor items.
• Add legs to improve stability and height.
With these simple steps, your vintage suitcase side table will not only serve a purpose but will also spark joy and storytelling in your home. Go ahead and give your old suitcases a new lease on life!
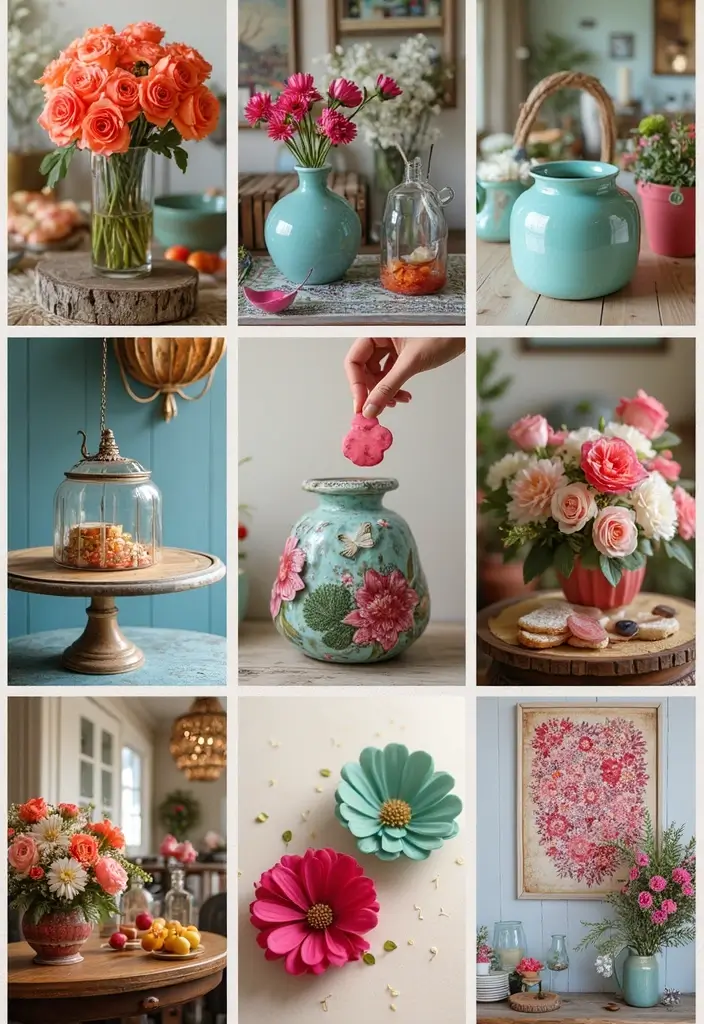
13. Glass Bottle Vases
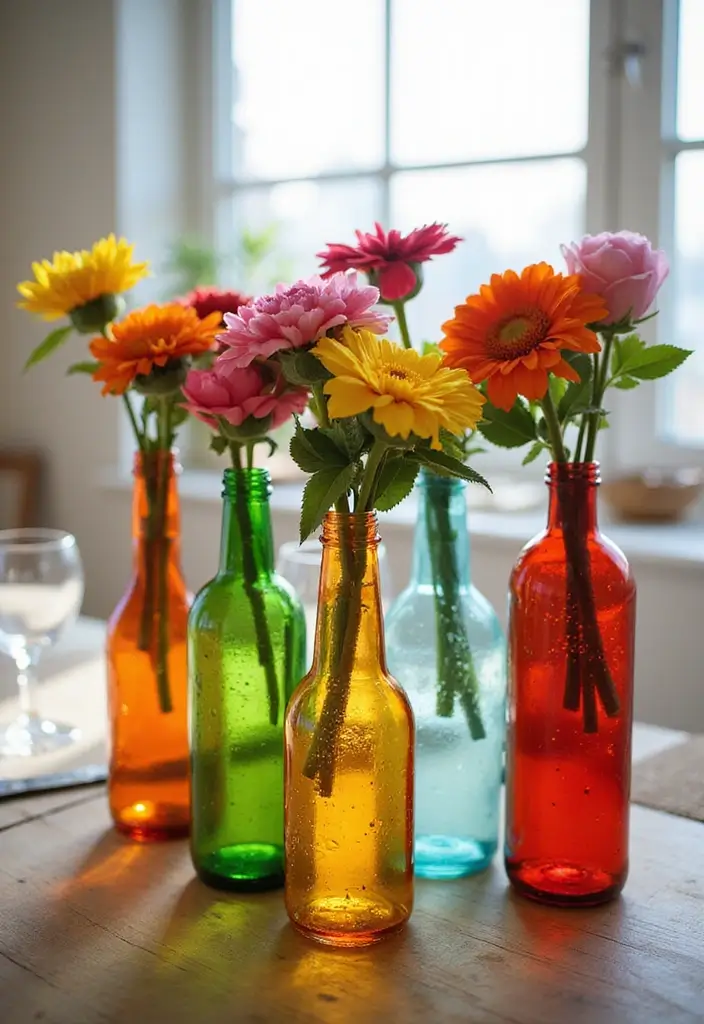
Transform empty glass bottles into stunning vases that brighten up your home. Whether you have wine, soda, or any other glass bottles, they can easily become eye-catching decor. You can paint them in vibrant colors or wrap them in twine for a cozy, rustic vibe. These vases stand out beautifully when filled with fresh blooms or dried flowers, making them perfect for any occasion or just to add charm to your living space.
To get started, gather a few bottles and decide on a style that speaks to you. Painting bottles is a fun, budget-friendly project. You can even customize colors to match your room. Think about grouping different shapes and sizes to create a dynamic centerpiece. This look is trending on platforms like Pinterest and can make your home feel warm and welcoming. Plus, it’s an excellent way to incorporate eco-friendly elements into your decor!
Tips for Your Bottle Vases:
– Choose vibrant colors that complement your decor.
– Use twine or lace for a rustic touch.
– Group bottles in sets of three or five for impact.
– Add personal designs by painting patterns or initials.
Making these glass bottle vases is a simple way to showcase your creativity. They not only serve a functional purpose but also add a personal flair to your home. Enjoy the process and let your personality shine through each piece!
14. Upcycled Crate Storage
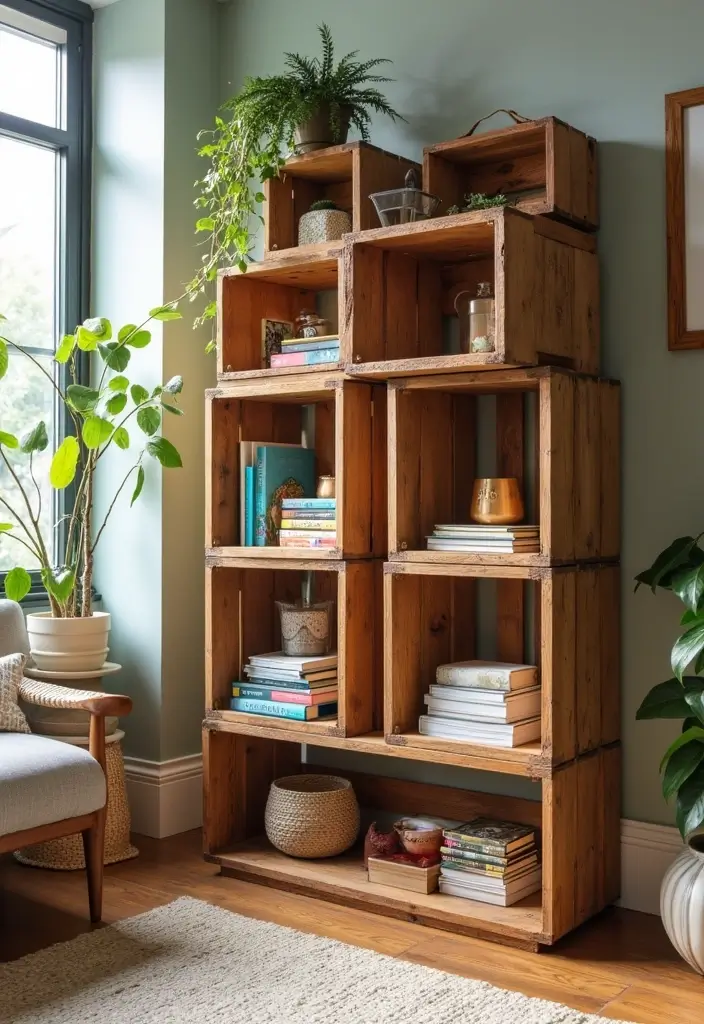
Transforming old wooden crates into stylish storage pieces is an easy and rewarding project. These crates add a rustic touch to any room, whether you stack them sideways to create unique shelves or lay them flat to serve as charming side tables. You can personalize them by painting in trendy colors like soft pastels or rich darks, matching your current decor. As seen in many home decor blogs, adding fabric liners or stenciling designs can elevate their look, making them truly your own.
To get started, gather a few crates from thrift stores or online marketplaces—often available at low prices. You can mix and match different crate sizes and styles for an eclectic vibe. Consider using these crates in various ways around your home. For example, place them in a kid’s playroom for organizing toys, or stack them to create a mini bar in your dining area. You’ll love how they can transform a space and provide practical solutions, making your home feel both organized and cozy.
• Use crates to neatly organize toys or craft supplies.
• Stack crates to form a creative mini bar with a countertop.
• Pick different styles for an eclectic and personal touch.
• Paint or stain to match your home’s color scheme easily.
These upcycled crates are not just functional; they bring a warm, inviting charm to your living space. Enjoy the satisfaction of creating something beautiful and practical from items that might otherwise go to waste!
15. Rug Made from Old Clothes
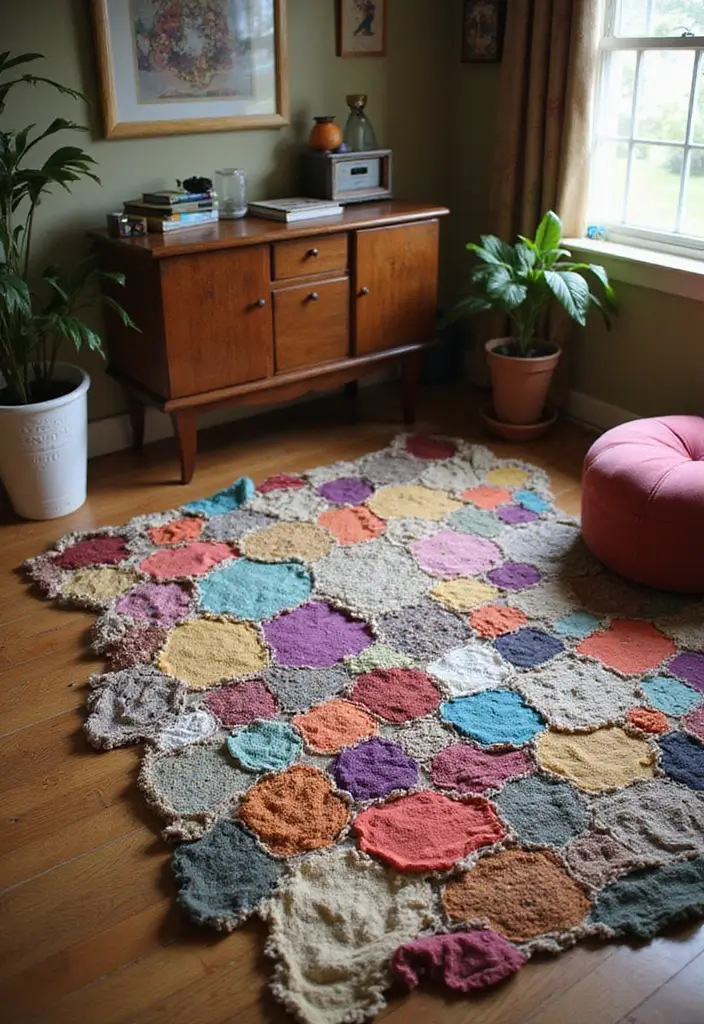
Create a cozy rug from your old clothes to refresh your home decor. This project not only helps you recycle items you no longer wear but also adds a unique touch to your space. Picture a soft rug made from a mix of colorful fabric strips, braided or crocheted together. You can find inspiration on platforms like Pinterest, where DIY enthusiasts share their creative takes on this trend. Imagine how a rug like this can brighten up a room, making it feel warm and inviting.
To get started, gather clothes that are too worn or small to wear. Cut them into strips, keeping the colors and patterns in mind for a fun design. If you’re on a budget, this project is perfect since you’re using items you already have. You can make your rug any shape you like, whether it’s round for a playful vibe or rectangular for a more classic look. Adding a non-slip backing can keep it safe and stable on your floors. This DIY project not only beautifies your home but also gives your space a personal touch.
• Use bright colors and patterns for a lively look
• Choose a non-slip backing for safety
• Pick any shape to fit your space perfectly
• Add crochet or braid techniques for texture
16. Faux Succulent Wall Planter
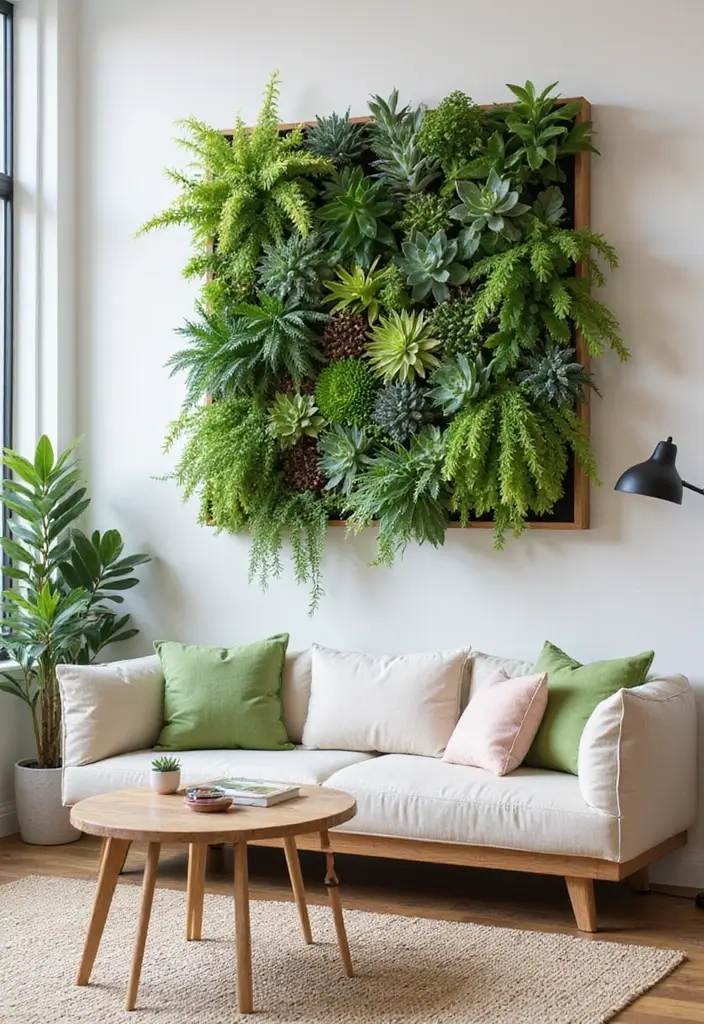
Imagine bringing the beauty of nature indoors without the hassle of caring for real plants. A faux succulent wall planter can do just that! With just a few materials, you can create a stunning piece of wall art that adds freshness and style to your space. Use a simple wooden frame, and attach a piece of mesh or thin wood. Then, secure your faux succulents in place with hot glue. Choose bright greens and soft pinks to mimic the lively colors of real plants, or go for a monochromatic look with shades of green for a modern vibe. This trendy decor item is perfect for any room, from your living room to your entryway.
Now, let’s talk about how to make this project a reality. First, gather your materials. You can often find inexpensive faux succulents at craft stores or online. This project is budget-friendly, making it a great option for those who want beautiful decor without spending a fortune. When arranging your succulents, think about different heights and textures to create depth. Hang your piece in a location where it will catch the eye, like above a sofa or in a hallway. This will not only brighten up the space but also make it feel inviting and warm.
• Use a mix of faux succulents for a lively display
• Choose a colorful frame to add character
• Hang in well-lit areas for maximum impact
• Arrange succulents at varying heights for interest
This project is perfect for anyone who loves greenery but struggles with plant care. Enjoy the beauty of succulents without the worry of watering or sunlight. Your home will feel more alive and welcoming in no time!
17. Painted Rock Garden Markers

Bring a splash of color to your garden with painted rock garden markers! This fun DIY project transforms ordinary stones into charming labels for your plants or herbs. Imagine vibrant greens, sunny yellows, and deep blues marking your flower beds. Plus, this trend is all over Pinterest right now, inspiring gardeners to add their personal touch to outdoor spaces.
To get started, gather smooth stones and waterproof paint. You can choose colors that match your garden theme or go wild with a rainbow of hues. Use a fine brush to write the names of your plants on the rocks. Place them near each plant, creating a delightful and organized arrangement. This not only helps you keep track of your herbs but also adds a whimsical flair to your garden.
On a budget? Look for stones in your backyard or local parks. It’s a wallet-friendly way to enhance your garden without spending much. This project can make your outdoor space feel lively and inviting, perfect for impressing guests or just enjoying your peaceful retreat.
• Choose smooth stones for easy painting and labeling.
• Use waterproof paint to ensure durability against weather.
• Arrange rocks in creative patterns to boost visual appeal.
• Consider using them indoors as quirky decor in pots or planters.
With a little creativity and some basic supplies, you can make your garden both beautiful and organized. Start painting today and watch your garden come alive!
18. Upcycled Tins into Garden Planters
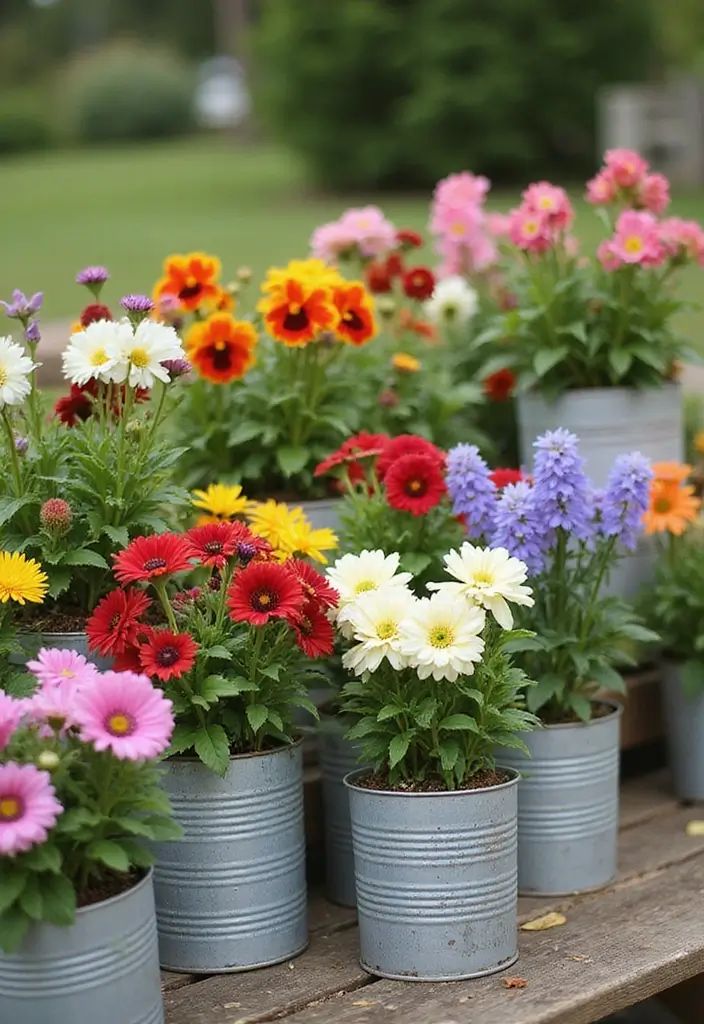
Transform ordinary tin cans into delightful garden planters that brighten up your outdoor space. Picture colorful, hand-painted cans filled with vibrant flowers or lush herbs. This DIY idea not only adds a splash of personality but also embraces eco-friendliness, a trend that’s gaining traction on platforms like Pinterest. Imagine walking into your garden and seeing these charming planters, each telling a story of creativity and sustainability.
To start, gather your old tin cans—soup cans, coffee tins, or even larger food containers work beautifully. First, clean and dry them thoroughly. Next, grab some bright paint and let your imagination run wild! You might opt for bold reds, sunny yellows, or calming blues. Don’t forget to drill a few small holes at the bottom for drainage. This simple step ensures your plants thrive, making your garden feel lively and inviting.
Here are some practical tips to make your upcycled planters shine:
– Mix sizes for a playful effect in your garden.
– Use twine to hang them from trees or hooks for vertical gardening.
– Label each can with the plant name for a neat, organized look.
– Choose plants that match your design—herbs like basil or colorful flowers like petunias work great!
This project is not only budget-friendly, but it also gives your garden a unique touch. Each planter becomes a mini work of art, making your space feel special and inviting. Dive into this fun DIY project and enjoy the satisfaction of recycling while creating a beautiful outdoor oasis.
19. Scrap Wood Wall Art

Transform your leftover scrap wood into a stunning wall art piece that speaks to your style! Instead of tossing those wood scraps, gather them to create a striking geometric design or a colorful mosaic. You can paint the pieces in shades that match your home decor, or simply leave them natural for that cozy rustic feel. This project is all the rage on platforms like Pinterest, where DIY enthusiasts showcase their creative flair.
To make your own scrap wood wall art, start by choosing a variety of wood pieces in different sizes. Mix and match colors or stick to a monochromatic palette for a more sophisticated look. Arrange the wood on a canvas or directly on your wall. You can hang it in the living room, hallway, or even a bedroom to add a unique touch. This project is both affordable and rewarding, making your space feel more personal and inviting.
Here are some practical tips to get you started:
Use leftover wood from old furniture or pallets for a cost-effective option.
Choose colors that complement your existing decor for harmony.
Pick shapes that resonate with you, like stars or hearts, for a personal touch.
Add a protective coat of varnish to enhance durability and shine.
Creating scrap wood wall art is a fun way to express yourself while keeping your home stylish. It’s perfect for those who love DIY projects and want to add a special, handcrafted element to their living space. So gather your materials and let your creativity shine!
20. Upcycled Wood Bench
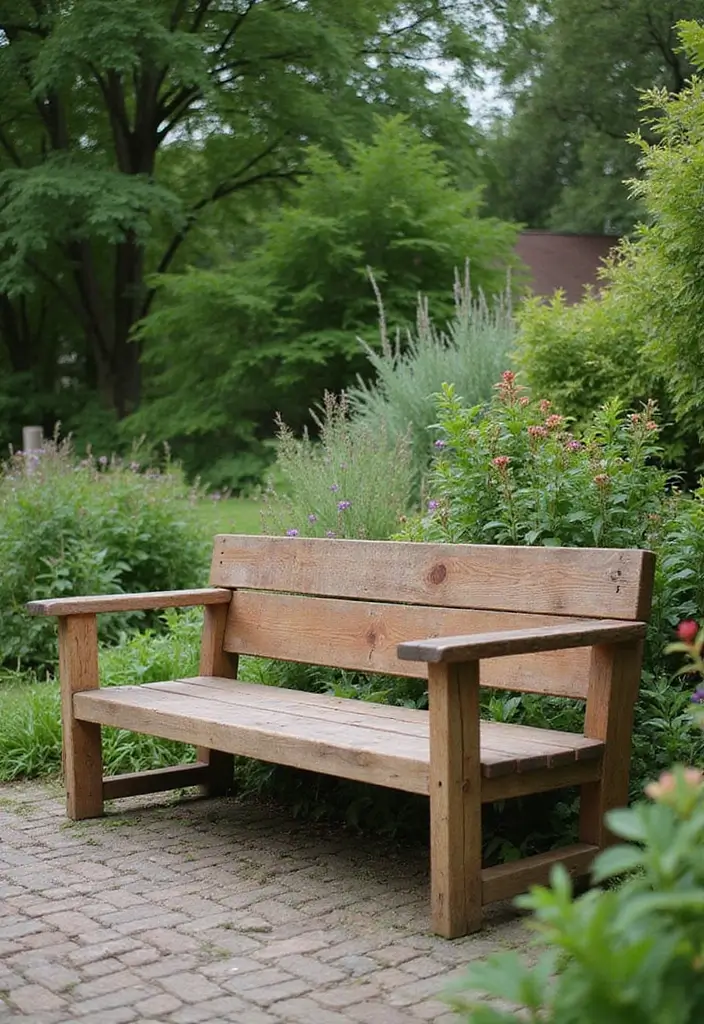
Create a stunning upcycled wood bench to enhance your outdoor space. You can turn old wood into a beautiful and functional piece that invites relaxation. Choose reclaimed wood or leftover planks, and sand them down to create a smooth surface. This bench not only adds charm but also serves as a cozy spot to enjoy your garden. Trendy minimalist styles, often seen on Pinterest, pair well with a simple design that lets the wood’s natural beauty shine.
For a practical approach, start by gathering materials from local salvage yards or even your garage. This project is budget-friendly, allowing you to repurpose items you already own. Once assembled, apply a weatherproof finish to protect your bench from rain and sun. Placing it in a shaded corner of your garden creates a perfect retreat. Imagine sipping coffee on a sunny morning or reading a book in the afternoon breeze. It’s the perfect blend of style and comfort.
• Choose reclaimed wood for an eco-friendly option.
• Sand down surfaces to ensure a smooth finish.
• Add cushions for extra comfort and style.
• Position in shade to create a serene outdoor nook.
This DIY bench is more than just furniture; it’s a way to express your creativity while making your outdoor area more inviting. Enjoy the satisfaction of crafting something unique that speaks to your personal style!
21. Shoe Organizer for Craft Supplies

Transforming an old shoe organizer into a clever storage solution for your craft supplies is a fantastic way to bring order to your workspace. Imagine hanging a vibrant, pocket-filled organizer on your wall or the back of your door. You can fill it with colorful paints, ribbons, brushes, and more. This upcycled project not only saves space but also adds a playful touch to your craft area, making it feel inviting and organized. Pinterest users are all about these creative hacks, highlighting how they can turn clutter into style!
When it comes to implementation, you have plenty of options. Look for shoe organizers at thrift stores or online marketplaces—these tend to be budget-friendly. You can even personalize your organizer with a splash of paint or some decorative fabric to match your room’s theme. Hang it in your craft room or garage to keep everything within reach. This simple change can make your crafting experience enjoyable and efficient, making it easier to find what you need without the mess.
• Label each pocket for quick access to supplies.
• Choose colorful fabric to cover the organizer for style.
• Hang it in a well-lit area for easy visibility.
• Fill with essential tools like scissors and glue sticks for organization.
By turning an ordinary shoe organizer into a vibrant craft supply holder, you not only declutter your space but also add a personal touch to your creative nook. Embrace this DIY project and watch your crafting area transform into a neat, inspiring space!
22. Upcycled Roller Skates Planters
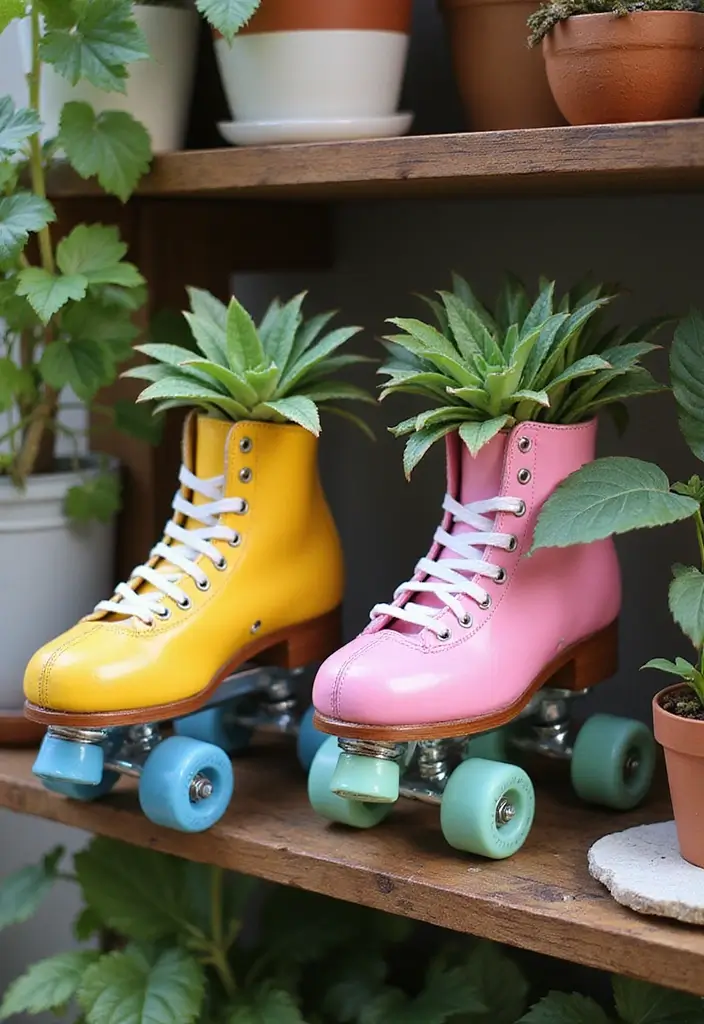
Imagine giving your old roller skates a fresh lease on life by transforming them into eye-catching planters! This creative project not only adds a whimsical touch to your home or garden but also sparks conversations. Clean those vintage skates, fill them with rich soil, and plant your favorite flowers or herbs. Brightly colored blooms can pop against the worn leather, creating a stunning visual contrast that’s sure to delight.
As seen on social media platforms like Pinterest, this trend is all about merging fun and functionality. You can paint the skates in lively hues to match your decor or leave them as is for a rustic vibe. Hang them on a wall or showcase them on a shelf for a quirky display that invites smiles.
Ready to dive in? Start by sourcing a pair of skates from thrift stores or online marketplaces for an affordable option. Make sure to drill holes in the soles for drainage, keeping your plants healthy. Pair the skates with a variety of plants—think trailing vines or bright flowers for texture and interest. This project is perfect for bringing a playful spirit to your living space while embracing eco-friendly practices.
• Choose vibrant paint for a lively, cheerful look
• Pick trailing plants like ivy for a whimsical touch
• Place skates on a shelf or hang them for added flair
• Add herbs for a functional twist in your kitchen
With just a little creativity, you can turn forgotten roller skates into charming planters that breathe life into your home. Enjoy the process of crafting something unique that reflects your personality and love for sustainability!
23. Colorful Button Art
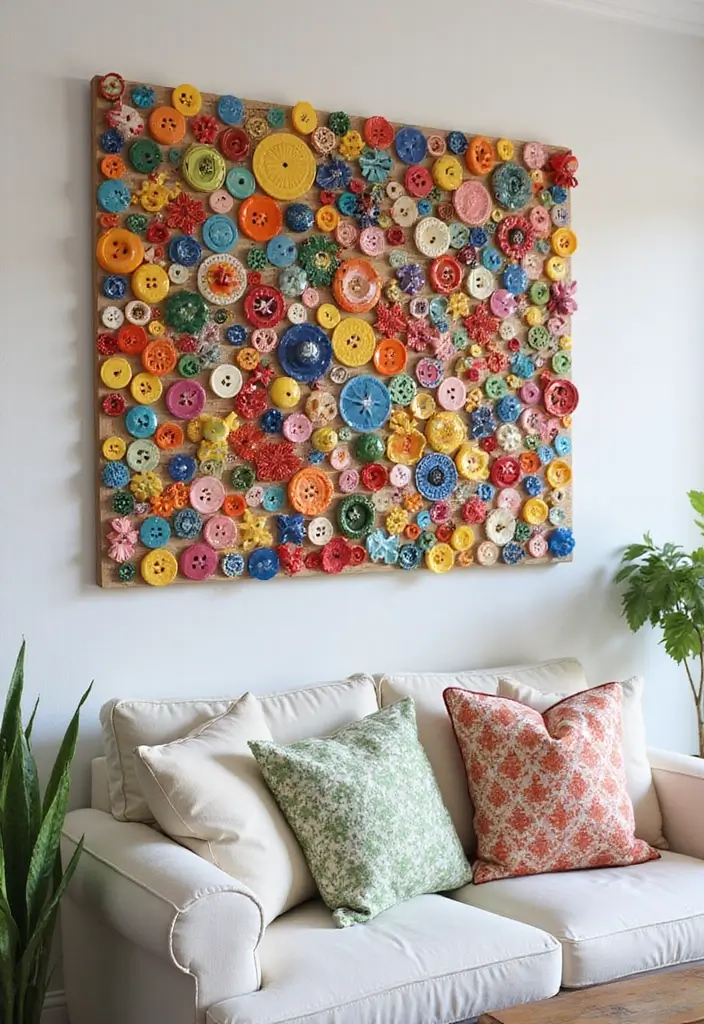
Bring your walls to life with colorful button art! This project allows you to transform old buttons into eye-catching designs. You can create letters, shapes, or even abstract patterns on a canvas. Imagine a vibrant piece in your living room that sparks conversation. Pinterest is buzzing with these fun ideas, showing how buttons can brighten up your space.
To get started, gather buttons in various colors and sizes. You can find them in your sewing kit or at thrift stores for a budget-friendly option. Lay out your design before gluing to see how it looks. Frame your artwork to give it a polished finish. If you’re feeling creative, consider making several pieces to create a stunning gallery wall. This adds a personal touch to your home and makes your decor feel warm and inviting.
• Choose buttons that match your room’s color scheme
• Arrange them on a canvas before gluing
• Frame your artwork for a polished look
• Create multiple pieces for a unique gallery wall
This DIY project is not just about reusing old items; it’s about expressing your creativity. You’ll enjoy the satisfaction of making something beautiful while adding a splash of color to your home. Perfect for kids and adults alike, this craft is a fun way to spend an afternoon. So, gather those buttons and let your imagination run wild!
24. Reclaimed Wood Photo Frame
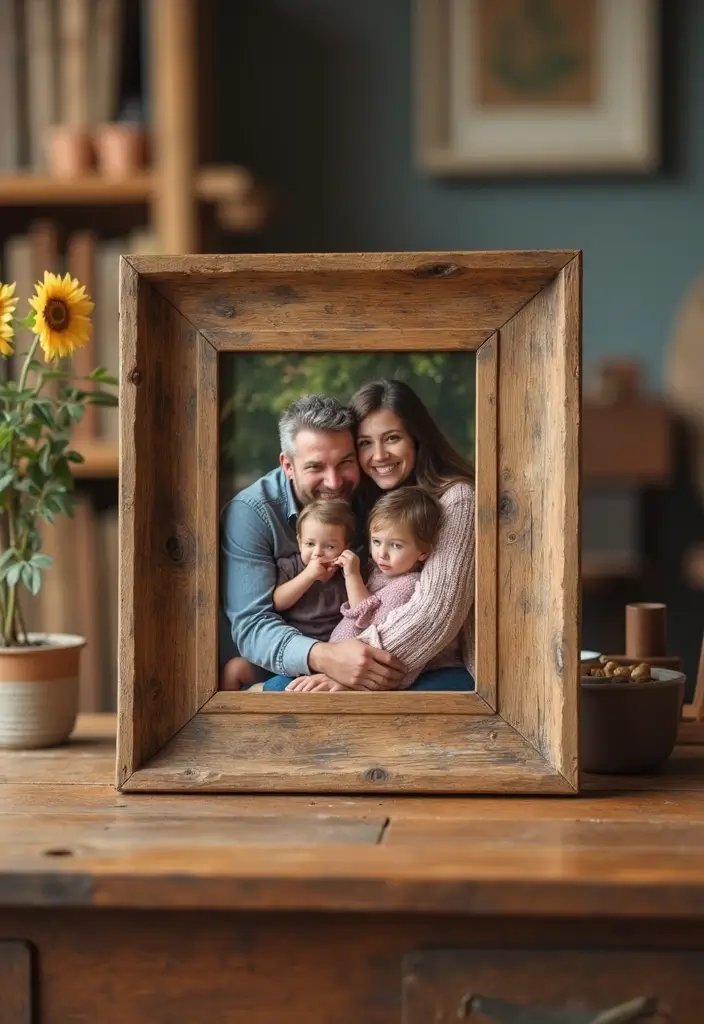
Transforming reclaimed wood into stunning photo frames is a creative way to showcase your treasured memories. Picture this: a rustic frame made from weathered wood, adding a cozy touch to your living space. You can embrace the natural beauty of the wood or add a splash of color that matches your décor. Pinterest is buzzing with ideas for these frames, making them a trendy choice for personalizing your home.
To get started, gather some reclaimed wood planks. Measure and cut them to your preferred dimensions for each frame. This project is budget-friendly—you can often find reclaimed wood at local thrift stores or online marketplaces. Once assembled, you can enhance the frame by adding decorative touches like twine or small embellishments. These frames not only look great but also make your home feel warm and inviting.
• Use weathered wood for a rustic vibe
• Paint frames in your favorite colors for a pop
• Create a gallery wall for a stunning display
• Add natural elements like shells or stones for charm
This DIY project is not just functional; it’s a heartfelt way to display your favorite photos while being kind to the planet. Whether you keep them for yourself or gift them to loved ones, these frames carry a personal touch that everyone will appreciate.
25. Upcycled Furniture Drawer Shelves
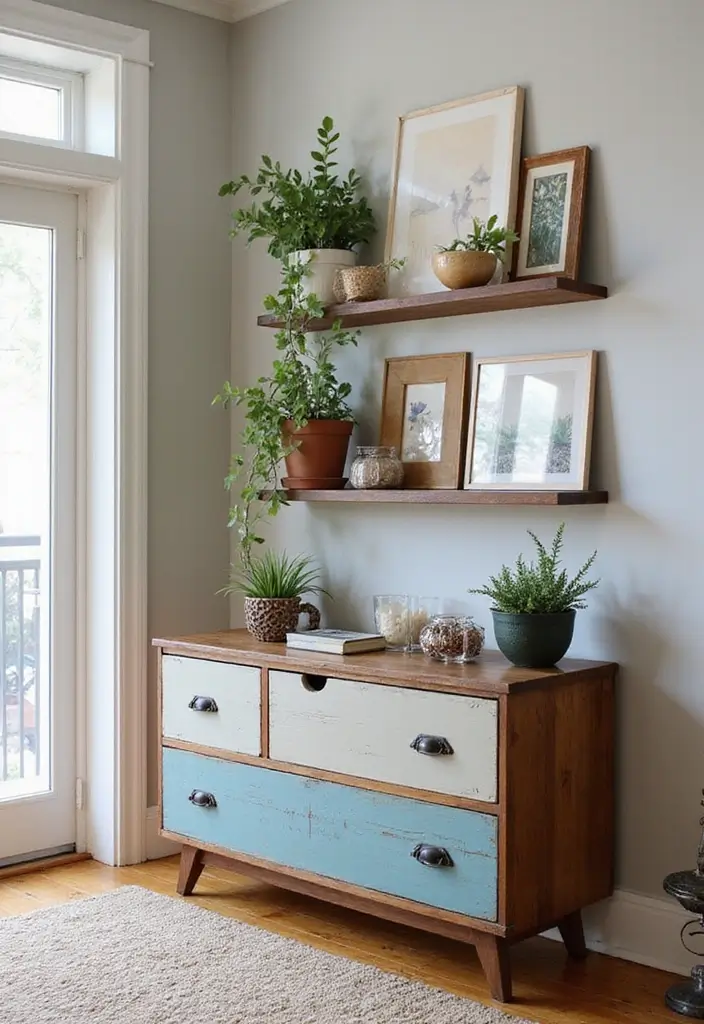
Breathe new life into old furniture by turning discarded drawers into stylish wall shelves! This creative DIY project not only helps you declutter but also adds a unique touch to your home. Imagine a weathered drawer painted in soft blue or a rustic brown, filled with your favorite succulents or cherished books. As seen on Pinterest, this trend celebrates upcycled decor, making your walls both functional and visually appealing.
To get started, simply remove the drawers from an old dresser. Sand them down for a smooth finish, then paint or stain them in colors that complement your space. Hang the shelves at different heights for a playful, eclectic look. This project is budget-friendly and allows you to express your style without breaking the bank. Plus, it creates a cozy atmosphere, perfect for showcasing personal treasures or family photos.
• Choose various drawer sizes for added dimension.
• Paint in trendy colors like mint green or classic white.
• Line the insides with fun wallpaper or fabric for flair.
• Hang them at different heights for a whimsical display.
This craft brings charm to your space while providing a clever storage solution. Enjoy the satisfaction of creating something beautiful and practical with items you already have!
Conclusion
There’s something incredibly satisfying about turning everyday items into stunning home decor. Not only do these DIY crafts allow for creative expression, but they also reinforce the importance of sustainability and individuality in our living spaces. With these 25 upcycled home decor ideas, you can easily enhance your home while embracing the beauty of handmade accessories. Ready to embark on your next crafting adventure? Let these projects inspire you and watch as your home transforms into a one-of-a-kind sanctuary!
Frequently Asked Questions
What Are Some Easy DIY Crafts for Home Decor Using Everyday Items?
You’d be surprised at how many DIY crafts for home decor you can create using everyday items! From transforming old jars into candle holders to turning wooden pallets into stylish shelves, the possibilities are endless.
Consider repurposing old furniture, like turning a worn-out dresser into a chic entryway table. These inexpensive home projects not only save money but also add a personal touch to your space.
How Can I Upcycle Furniture for a Unique Home Decor Look?
Upcycling furniture is a fantastic way to achieve a unique home decor style! Start by choosing pieces that need a little love, like a vintage chair or an old coffee table. Use paint, fabric, or new hardware to refresh their look.
Don’t forget to incorporate creative decor ideas like stenciling or decoupage to really make them stand out. This approach not only creates handmade home accessories but also promotes sustainability in your home.
What Are Some Budget-Friendly Crafts for Home Decoration?
Looking for budget-friendly crafts to spruce up your home? Start with simple projects like creating wall art from fabric scraps or designing a photo gallery with thrifted frames. You can also make decorative vases from empty bottles or jars.
These projects allow you to express your creativity without breaking the bank, all while adding character to your living space!
Can I Use Upcycled Materials for DIY Home Decor Projects?
Absolutely! Using upcycled materials for your DIY home decor projects is a great way to be eco-friendly and innovative. Old wood, glass containers, and even fabric scraps can be transformed into beautiful decor pieces.
For instance, you can turn old wine crates into rustic shelves or use tin cans as planters. The key is to think creatively about how to repurpose items you already have!
What Are Some Creative Decor Ideas for Small Spaces?
When it comes to small spaces, getting creative is essential! Utilize vertical space with hanging shelves made from reclaimed wood or repurpose old ladders as decorative book displays.
Another idea is to use multifunctional furniture, like ottomans that double as storage. These creative decor ideas not only maximize your space but also give you the opportunity to show off your personal style through handmade home accessories.